Tuesday, December 21, 2010

End of Semester


This year went by really fast. It only seems like a few weeks ago that we began learning about human gesture drawings using models for reference. Following after that are the contour shell drawings and building muscles for the manikin. Although I like drawing during my leisure time, I can’t say it was easy all the way through this semester. Using different media, tools, and techniques on our projects and in-class drawings helped improve my drawing skills a little. I also think seeing other people’s work can be inspirational and it gave me a wider view of how others approach each assignment. Taking this class has improved my line weight and control, and how line placement can become important in works. I think what I can work on in the future is use more dark lines and shades. I noticed that I always end up drawing light works, but I’m gradually trying to add more values in my work.
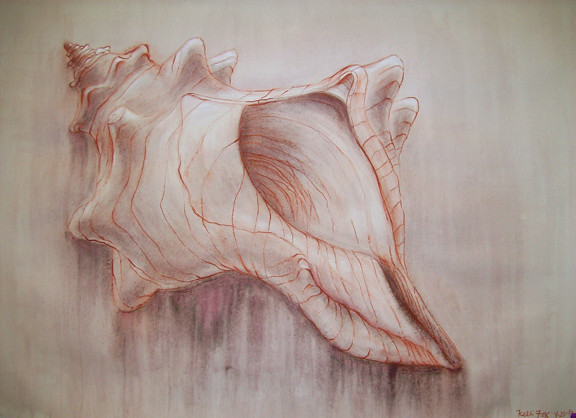
With this being our final shell drawing, I wanted to use graphite and pencil to draw the contour outline since I used conte in my third drawing. After adding ink to the paper, I noticed that the contour lines are becoming lighter and blending with the ink. I wasn’t sure of how it will turn out, but I continued to add more shades to the shell. This time I added some darker shades in the background to help the lighter part of the shell pop, as discussed in our class shell critique. In the end I am pleased with my result. Although it may be hard to see the contour lines from afar, the light colors and lines make the shell appears soft on paper. I was surprised when we discuss in class that my shell seems to represent me, a quiet delicate shell. Looking back at my work, I guess it does.

Sunday, November 21, 2010

Reflection 10


This week we discuss about applying ink to our contour shell drawings. After drawing our contour shell drawings, we will add ink to the drawing. Ink is similar to water. It has a natural flow that will help make the shell look as if it’s alive. Adding more than one color can help push the shell to become more alive looking. Colors that were suggested in class other than black are brown, sepia, red, green, tea, or coffee. Have more than 4 containers or tapper wares to store the ink and water. Try different amount of water and ink combination to get different shades of colors.
            We will use bamboo brushes and/or other brushes to paint on the drawing. Perhaps a fine small or medium size will work. Using different brush size can give us different results in the ink size and stroke. A varnish brush will be good to use for covering large area of the drawing. Trying different techniques with different brushes can give more variety in the drawings.
A good tip before inking on the drawing would be to paint a light layer of clear water across the paper before inking. This will give the drawing a more natural look when the ink and water combines, which can also gives a different look to the drawing later it dry. While painting on the drawing, I should remember to use my whole arm to paint. This will give me more control over the area on the paper, especially if the size of the paper is large. Sometimes it is rather hard to control the flow of ink as it moves through the paper.
Start out by painting light tones on the drawing and add darker tones if necessary to enhance the shell’s look. Unlike the contour shell drawing, the lighter shade tones will be used in the background while the darker tones will be used in the in the foreground and shadow areas. The area where light hits the shell will remain the same color as the paper. If the paper is any color other than white, a white charcoal or conte can be use to highlight some of the features on the shell.

Here are examples of shell drawings with ink that other students drew.


Tuesday, September 21, 2010

Reflection 2


We began the second week drawing contour lines with shells and human figures.  Our first attempt is to draw the shell without looking at our drawings. This is to help us concentrate more on the object than the drawing itself.  I figure it is harder than it looks. I drew the shell multiple times with different angles to help me see the overall view of the shell. In some parts of the blind contour drawing, I would exaggerate the length of the shell, or make other parts of the shell appear visible on paper when it will not in real perspective. The class gave an overall critique to some of the drawings and point out similarity or differences they see. We also went over some principles of how a line looks with variation of weight, speed, overlap, and others. The other half of class, we continued our continuous contour drawing of shells, except we can look over our drawings now. We later compare and contrast both drawings and notice that although our second drawing may appear more similar to the actual shell, our concentration on the lines strayed off. Guess I need more practice with contour drawings.
During this week we also began our first model drawing. We start off with some quick gesture drawing for about thirty seconds to one minute. After that, the time was stretched from two-to-five minutes. Gesture drawing mostly captures the action of the model; details can be added if needed. We learn about how the spinal cord plays an important role in how the model moves and pose. Proportion is important, but we are supposed to concentrate more on the model’s pose instead. A line’s weight and thickness can help the viewer distinguish the body part that is closer and farther to the foreground. I seem to find a sense of beauty in the heavy and light lines for gesture drawing. It gives a sense of flow and liveliness to the drawing.

Tuesday, September 14, 2010

Reflection 1


This week started off as our class gets a brief introduction to what will be taught in class throughout the semester. Rather than working with still live, we will learn about the human body and how it works. This could range from bone structures, muscles, shapes, and body forms.
It was mentioned that we would use clay to make muscles on a small-scale skeleton to help us better understand where different part of the muscles are place and how they work. We will also learn how different lines and the weight of each line makes a different in the art using different media and techniques.
One thing that surprised me is how our instructor mentioned that we would use shells as our model to practice drawing lines. Shell has similar shape to that of a human shape since they have edges and curves. After showing the class some pictures that other student work on, it gives me a better idea of the lines and shape that our instructor mentioned in class. I hope taking this class could give me ideas, inspiration, and techniques to help develop my skill further as an artist.

Here an image sample that was shown in class about shells.